在本教程中,我们将向您展示如何在 Debian 11 上安装 LibreNMS。对于那些不知道的人,LibreNMS 是一个自动发现的基于 PHP/MySQL 的网络监控系统,包括对各种网络硬件和操作系统,包括 Cisco、Linux、FreeBSD、Juniper、Brocade、HP 等等。
本文假设您至少具有 Linux 的基本知识,知道如何使用 shell,最重要的是,您将站点托管在自己的 VPS 上。 安装非常简单,假设您在 root 帐户中运行,否则您可能需要添加 ‘sudo‘ 到获得 root 权限的命令。 我将向您展示在 Debian 11 (Bullseye) 上逐步安装 LibreNMS 网络监控系统。
在 Debian 11 Bullseye 上安装 LibreNMS
步骤 1. 在我们安装任何软件之前,请务必通过运行以下命令来确保您的系统是最新的 apt 终端中的命令:
sudo apt update sudo apt upgrade sudo apt install acl curl composer fping git graphviz imagemagick mtr-tiny python3-dotenv python3-pymysql python3-redis python3-setuptools python3-systemd rrdtool snmp snmpd whois
步骤 2. 安装 LAMP 堆栈。
需要 Debian 11 LEMP 服务器。 如果您没有安装 LAMP,请阅读我们之前的教程,在 Debian 11 上安装 LEMP 服务器。
步骤 3. 为 LibreNMS 创建一个用户帐户。
现在我们添加 LibreNMS 用户:
sudo useradd librenms -d /opt/librenms -M -r -s /bin/bash
步骤 4. 在 Debian 11 上安装 LibreNMS。
现在我们将 LibreNMS 存储库克隆到 /opt 目录使用 git 命令:
cd /opt sudo git clone https://github.com/librenms/librenms.git librenms
我们需要更改一些文件夹权限:
sudo chown -R librenms:librenms /opt/librenms sudo chmod 771 /opt/librenms sudo setfacl -d -m g::rwx /opt/librenms/rrd /opt/librenms/logs /opt/librenms/bootstrap/cache/ /opt/librenms/storage/ sudo setfacl -R -m g::rwx /opt/librenms/rrd /opt/librenms/logs /opt/librenms/bootstrap/cache/ /opt/librenms/storage/
步骤 5. 安装 PHP 依赖项。
运行以下命令在您的 Debian 系统上安装 PHP 所需的所有依赖项:
sudo -u librenms bash ./scripts/composer_wrapper.php install --no-dev exit
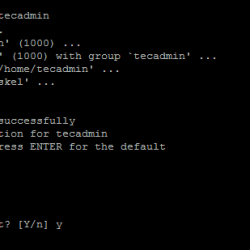
步骤 6. 配置 MariaDB。
默认情况下,MariaDB 未加固。 您可以使用以下方法保护 MariaDB mysql_secure_installation 脚本。 您应该仔细阅读以下每个步骤,这些步骤将设置 root 密码、删除匿名用户、禁止远程 root 登录以及删除测试数据库和访问安全 MariaDB 的权限:
mysql_secure_installation
像这样配置它:
- Set root password? [Y/n] y - Remove anonymous users? [Y/n] y - Disallow root login remotely? [Y/n] y - Remove test database and access to it? [Y/n] y - Reload privilege tables now? [Y/n] y
接下来,我们需要登录到 MariaDB 控制台并为 LibreNMS 创建一个数据库。 运行以下命令:
mysql -u root -p
这将提示您输入密码,因此请输入您的 MariaDB 根密码并点击 Enter. 登录到数据库服务器后,您需要为 LibreNMS 安装创建一个数据库:
MariaDB [(none)]> CREATE DATABASE librenms_db; MariaDB [(none)]> CREATE USER 'librenms_user'@'localhost' IDENTIFIED BY 'your-strong-password'; MariaDB [(none)]> GRANT ALL PRIVILEGES ON librenms_db.* to [email protected]'localhost'; MariaDB [(none)]> FLUSH PRIVILEGES; MariaDB [(none)]> exit
之后,编辑 MariaDB 的配置:
echo 'innodb_file_per_table=1' >> /etc/mysql/mariadb.conf.d/50-server.cnf echo 'lower_case_table_names=0' >> /etc/mysql/mariadb.conf.d/50-server.cnf
步骤 7. 配置 Nginx。
为 LibreNMS 安装创建一个 Nginx 虚拟主机文件:
sudo nano /etc/nginx/sites-enabled/librenms.vhost
添加以下文件:
server { listen 80; server_name librenms.your-domain.com; root /opt/librenms/html; index index.php; charset utf-8; gzip on; gzip_types text/css application/javascript text/javascript application/x-javascript image/svg+xml text/plain text/xsd text/xsl text/xml image/x-icon; location / { try_files $uri $uri/ /index.php?$query_string; } location ~ [^/].php(/|$) { fastcgi_pass unix:/run/php-fpm-librenms.sock; fastcgi_split_path_info ^(.+.php)(/.+)$; include fastcgi.conf; } location ~ /.(?!well-known).* { deny all; } }
Save 和 close 文件,然后重新启动 Nginx Web 服务器,以便进行更改:
sudo systemctl restart nginx
接下来,为 LibreNMS 启用命令自动完成:
sudo ln -s /opt/librenms/lnms /usr/bin/lnms sudo cp /opt/librenms/misc/lnms-completion.bash /etc/bash_completion.d/
之后,复制cron作业信息开启自动发现,复制logrotate配置文件轮换旧日志:
sudo cp /opt/librenms/librenms.nonroot.cron /etc/cron.d/librenms sudo cp /opt/librenms/misc/librenms.logrotate /etc/logrotate.d/librenms
步骤 8. 访问 LibreNMS Web 界面。
成功安装后,打开网络浏览器并转到 https://librenms.your-domain.com 您将看到以下屏幕:
恭喜! 您已成功安装 LibreNMS。 感谢您使用本教程在 Debian 11 Bullseye 上安装最新版本的 LibreNMS 网络监控系统。 如需更多帮助或有用信息,我们建议您查看 LibreNMS 官方网站.